Friday, April 5, 2013
Power Amplifier OCL 40W by 2N3055 MJ2955
The 40W Amp OCL 2N3055 MJ2955 is easy to build,and very inexpensive. To use Power Supply 35V -35V 2A. Transistor 2N3055 MJ2955 must be mounted on heatsink. Can be directly connected to CD players, tuners and tape recorders.
This circuit is one that stands out for ages over 40 years, with
sound quality that is hard to find compared be other circuits. If you
experimental build or ask people who try already built. Will believe
that this is not as exaggerated statement more than true.
This power amplifier series circuit, be able to output of up to 40
watt on load 8 ohm, and will provide output capacity of up to 60 watt
load 4 ohm.
The circuit design an All complementary all direct coupling (except the
input), Making low frequency response of the circuit well.

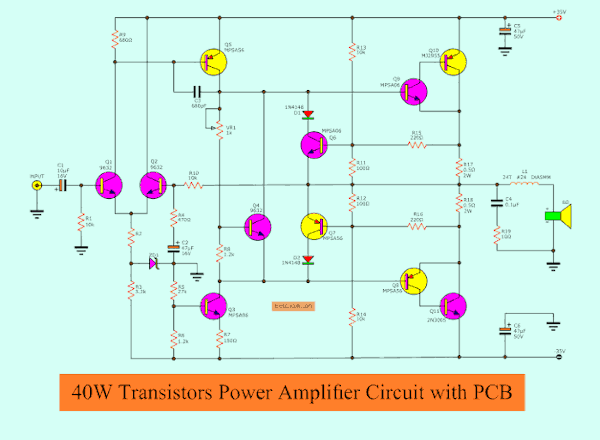
Circuit 40W Amp OCL 2N3055 MJ2955
The transistor(MPS9632) Q1, Q2 together to as a
differential amplifier, By has R10,R4 and C2 together constitute the
feed back circuit and defined an all gain ratio of circuit. At emitter
circuit has zener diode is connected as maintain a constant voltage 15V.
The transistor Q5 is the part second amplifier circuit, by has C3 is
to feedback between pin base and collector, for prevent procreation
oscillator way high frequency
Q8,Q9 acting as the driver circuit to drives the power transistor Q10(MJ2955),Q11(2N3055).
For Q6, Q7 acts as the output transistor protection circuit from damage.
Because the current flowing through the load too much such as a speaker
cable short-circuited, by will acts as short the bias circuit of the
output transistor is reduced so that it not works.
Q3 serves limit current, the general bootstrapped circuit that use
the RC. for Q4 acts as setting bias level of the output transistor which
which be instead Diodes same the normal amplifier circuit. This
connection reduces the crossover distortion as well.
VR1 serves as to adjust a bias voltage the idle current to the circuit.
Parts
Q1,Q2,Q3_________MPS9632___Transistors, Bipolar, Si NPN Low-Power Audio Frequency Small Signal Transistors or
Replace Part is BC167, BC171, BC182, BC237, BC547
Q3,Q6,Q9_________MPSA06____NPN general purpose transistor ____
Replace Part : BC 639, 2SD667, 2SD1226, 2SD1616A
Q5,Q7,Q8_________MPSA56____Small Signal General Purpose PNP___
Replace Part : BC 640, 2SB647, 2SB910, 2SB1116A
Q10______________MJ2955
Q9_______________2N3055
ZD1______________15V 0.5W___zener diode
D1,D2_____________1N4148____75V 150mA Diodes
R1,R10,R13,R14_____10K____1/4W Resistor
R2________________7.5K___ 1/4W Resistor
R3________________3.3K___ 1/4W Resistor
R4________________470 OHM__ 1/4W Resistor
R5________________27K_____ 1/4W Resistor
R6,R8_____________1.2K_____ 1/4W Resistor
R7________________150 OHM___ 1/4W Resistor
R9________________680 ohm___ 1/4W Resistor
R11,R12___________100 ohm ___ 1/4W Resistor
R15,R16___________220 ohm ___ 1/4W Resistor
R17,R18___________0.5 ohm ___ 2W Resistor
R19_______________10 ohm ____ 1W Resistor
VR1_______________1K Potentiometer
C1________________10uF 16V___ Electrolytic Capacitors
C2________________47uF 16V___ Electrolytic Capacitors
C3________________680pF 50V_____ Polyester Capacitor
C4________________0.1uF 63V_____ Polyester Capacitor
C5,C6_____________47uF 50V_____ Electrolytic Capacitors
L1 use #24 copper wire on air coil 5mm.
2SA1248=2SA1249=SAB649
2SC3116=2SC3116=2SC3117=2SD669

PCB 40W Amp OCL 2N3055 MJ2955
Customization this circuit.
When this project is done, not to the speaker cable, adjust VR1 at the
center. And then power supply to the circuit, to measure at output point
as the loud speaker with the ground Should be less than 0V or 0.1V.
Then uses the voltmeter to measure the voltage across R17, as with
adjust the VR1 slowly until you read 0.01V Or may be adjusted by
measuring the Idle current is about 15-30mA.
And then, connect the speakers, and input single to use work immediately.